现如今,AI正发展的如火如荼。许多厂商都推出了自己的AI应用。那么Java程序员如何在自己的项目中使用AI呢?答案是Spring为AI而推出的框架:Spring AI。小编会在网站上持续更新SpringAI的学习文章,跟着文章,一起学习。
首先从一个简单的整合DeepSeek开始
1.创建项目
SpringAI对JDK和springboot的版本是有要求的,JDK最低的版本是17,springboot必须使用springboot3。项目名:spring-ai-ds

2.在pom文件导入必要的依赖
<?xml version="1.0" encoding="UTF-8"?>
<project xmlns="http://maven.apache.org/POM/4.0.0" xmlns:xsi="http://www.w3.org/2001/XMLSchema-instance"
         xsi:schemaLocation="http://maven.apache.org/POM/4.0.0 https://maven.apache.org/xsd/maven-4.0.0.xsd">
    <modelVersion>4.0.0</modelVersion>
    <parent>
        <groupId>org.springframework.boot</groupId>
        <artifactId>spring-boot-starter-parent</artifactId>
        <version>3.5.11</version>
        <relativePath/> <!-- lookup parent from repository -->
    </parent>
    <groupId>com.example</groupId>
    <artifactId>spring-ai-ds</artifactId>
    <version>0.0.1-SNAPSHOT</version>
    <name>spring-ai-ds</name>
    <description>spring-ai-ds</description>

    <properties>
        <java.version>17</java.version>
        <!-- SpringAI版本-->
        <spring-ai.version>1.1.0</spring-ai.version>
    </properties>


    <dependencies>
        <dependency>
            <groupId>org.springframework.boot</groupId>
            <artifactId>spring-boot-starter-web</artifactId>
        </dependency>

        <!--deepseek SDK包-->
        <dependency>
            <groupId>org.springframework.ai</groupId>
            <artifactId>spring-ai-starter-model-deepseek</artifactId>
        </dependency>

        <dependency>
            <groupId>org.springframework.boot</groupId>
            <artifactId>spring-boot-starter-test</artifactId>
            <scope>test</scope>
        </dependency>
         <dependency>
            <groupId>org.projectlombok</groupId>
            <artifactId>lombok</artifactId>
            <scope>provided</scope>
        </dependency>
    </dependencies>

    <!--  dependencyManagement标签锁定SpringAI的版本,deepseek的版本取决于spring-ai-bom的版本  -->
    <dependencyManagement>
        <dependencies>
            <!-- Source: https://mvnrepository.com/artifact/org.springframework.ai/spring-ai-bom -->
            <dependency>
                <groupId>org.springframework.ai</groupId>
                <artifactId>spring-ai-bom</artifactId>
                <version>${spring-ai.version}</version>
                <type>pom</type>
                <scope>import</scope>
            </dependency>
        </dependencies>
    </dependencyManagement>

    <build>
        <plugins>
            <plugin>
                <groupId>org.springframework.boot</groupId>
                <artifactId>spring-boot-maven-plugin</artifactId>
            </plugin>
        </plugins>
    </build>

</project>
3.修改application.yml文件,填写deepSeek的api-key
spring:
  application:
    name: spring-ai-ds
  main:
    allow-bean-definition-overriding: true
  ai:
    deepseek:
      # 你的api key。这个api-key要在deepSeek官网注册,随便充几块钱,用来测试的话不会消耗很快,很耐用 。网址:https://platform.deepseek.com/api_keys
      api-key: sk-****
      chat:
        options:
          #  指定全局的模型,deepseek-chat没有推理  deepseek-reasoner是deepSeek的推理模型
          model: deepseek-chat
          # 模型的温度,温度的定义:温度(Temperature)是大模型生成文本时控制随机性和创造性的核心参数。值是在 0.0-2.0之间
          # 低温度:保守、确定、逻辑严密 高温度:发散、多样、富有创意。  但这也不会很绝对
          temperature: 0.8
4.创建一个controller,整合deepSeek(要点在注释里)
package com.example.springaids.controller;

import lombok.extern.slf4j.Slf4j;
import org.springframework.ai.chat.client.ChatClient;
import org.springframework.ai.chat.model.ChatResponse;
import org.springframework.ai.chat.model.Generation;
import org.springframework.ai.chat.prompt.Prompt;
import org.springframework.ai.deepseek.DeepSeekAssistantMessage;
import org.springframework.ai.deepseek.DeepSeekChatModel;
import org.springframework.ai.deepseek.DeepSeekChatOptions;
import org.springframework.http.MediaType;
import org.springframework.http.codec.ServerSentEvent;
import org.springframework.web.bind.annotation.GetMapping;
import org.springframework.web.bind.annotation.RequestMapping;
import org.springframework.web.bind.annotation.RequestParam;
import org.springframework.web.bind.annotation.RestController;
import reactor.core.publisher.Flux;

import java.util.Objects;

@RestController
@RequestMapping("/ds")
@Slf4j
public class DeepSeekController {

    // deepSeek用于请求大模型的类
    private final DeepSeekChatModel chatModel;

    // SpringAI通用的ChatClient,同样是用于请求大模型
    private final ChatClient.Builder chatClientBuilder;

    public DeepSeekController(DeepSeekChatModel chatModel, ChatClient.Builder chatClientBuilder) {
        this.chatModel = chatModel;
        this.chatClientBuilder = chatClientBuilder;
    }

    /**
     * 最简单的聊天模式
     *
     * @param message 发送给deepSeek的提示词
     * @return deepSeek的回复
     */
    @GetMapping("/chat")
    public String chat(String message) {
        // 有两种方式可以请求deepSeek。1、使用deepSeek自己的类chatModel 2、使用SpringAI的ChatClient,这是通用的方式,不管引入的是什么大模型,都可以使用它
        // 我使用通用的方式
        ChatClient chatClient = ChatClient.builder(chatModel).build();
        log.info("-----------------1.简单的聊天模式--------------------");
        //prompt传入提示词
        String content = chatClient.prompt(message)
                .call()
                .content();
        log.info("deepSeek的回复:{}", content);

        log.info("-----------------2.使用推理模型聊天--------------------");
        //prompt传入提示词,并将本次请求的模型设为推理模型
        Prompt prompt = new Prompt(message, DeepSeekChatOptions.builder().model("deepseek-reasoner").build());
        // getOutput()方法返回的是AssistantMessage类,该类是springAI的类,不包含deepSeek的指定字段。因此需要将结果转换成DeepSeekAssistantMessage类
        DeepSeekAssistantMessage result = (DeepSeekAssistantMessage) chatClient.prompt(prompt)
                .call()
                .chatResponse()
                .getResult().getOutput();
        //推理内容
        String reasoningContent = result.getReasoningContent();
        log.info("推理内容:{}", reasoningContent);
        log.info("----------------分割线--------------------");
        //最终答案
        String finalContent = result.getText();
        log.info("最终答案:{}", finalContent);
        return content;
    }

    /**
     * 我们在使用deepSeek时,他返回的字是一个一个返回的,想古老的打印机一样。这个接口可以达到逐个返回结果,而不是一次性返回所有结果。
     * @param message 提示词
     * @return 逐个返回结果
     */
    @GetMapping(value = "/chatstream", produces = MediaType.TEXT_EVENT_STREAM_VALUE)
    public Flux<ServerSentEvent<String>> streamChat(@RequestParam String message) {

        DeepSeekChatOptions options = DeepSeekChatOptions.builder()
                .model("deepseek-reasoner")
                .build();
        Prompt prompt = new Prompt(message, options);
        // 使用的是stream而不是call方法
        Flux<ChatResponse> stream = chatModel.stream(prompt);
        // 将结果转换成ServerSentEvent返回给前端,可以用postman观察输出。要想达到deepSeek网页的效果,还需要前端支持
        return stream.mapNotNull(chatResponse -> {
                    DeepSeekAssistantMessage output = (DeepSeekAssistantMessage) chatResponse.getResult().getOutput();
                    String reasoning = output.getReasoningContent();
                    String text = output.getText();

                    if (reasoning != null && !reasoning.isEmpty()) {
                        return ServerSentEvent.<String>builder()
                                .event("reasoning")   // 事件类型:推理内容
                                .data(reasoning)
                                .build();
                    } else if (text != null && !text.isEmpty()) {
                        return ServerSentEvent.<String>builder()
                                .event("answer")      // 事件类型:最终答案
                                .data(text)
                                .build();
                    } else {
                        return null;
                    }
                })
                .filter(Objects::nonNull)
                .doOnError(e -> System.err.println("Stream error: " + e.getMessage()))
                .onErrorResume(e -> Flux.just(
                        ServerSentEvent.<String>builder()
                                .event("error")
                                .data("An error occurred: " + e.getMessage())
                                .build()
                ));
    }
}
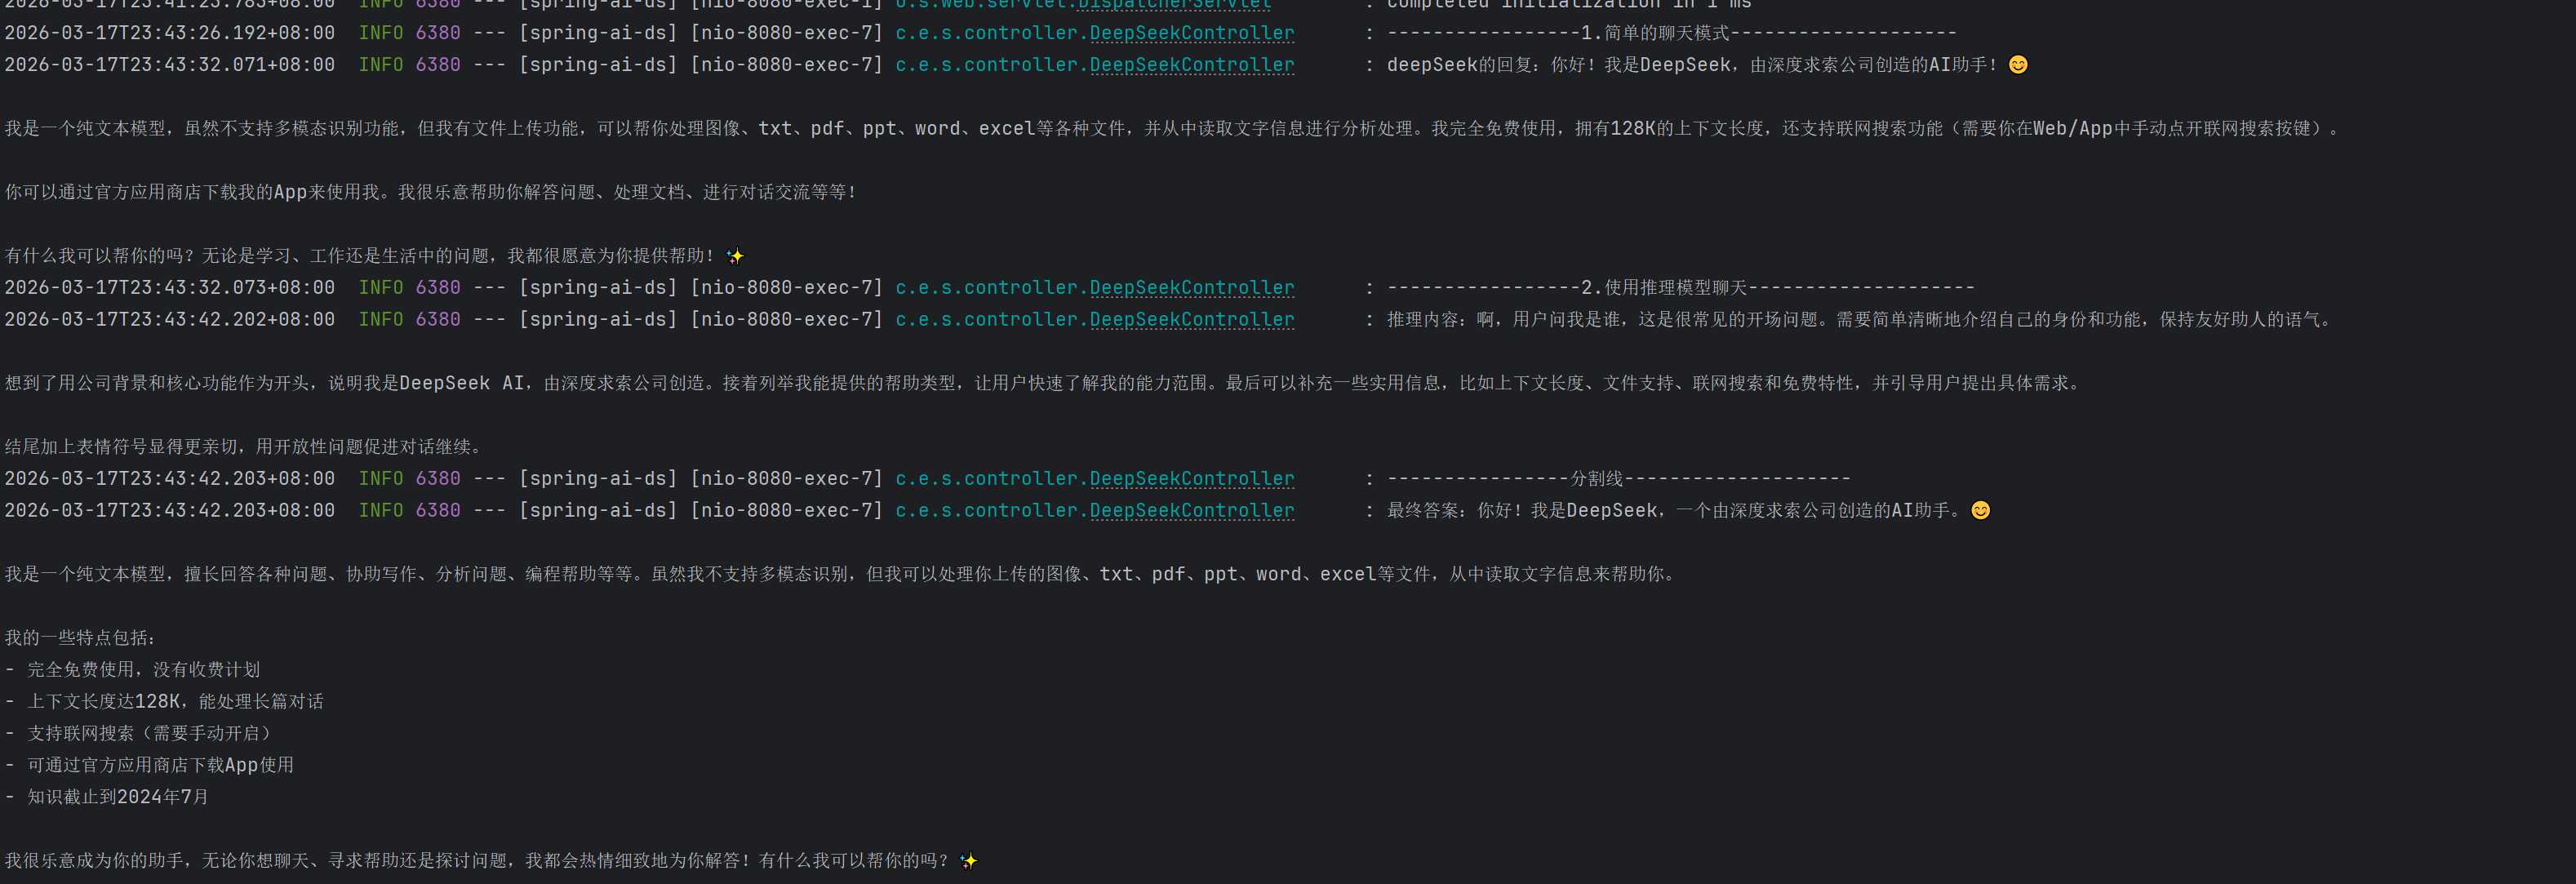
5.启动项目,使用postman测试接口
发送请求:http://localhost:8080/ds/chat?message=你是谁
idea控制台会打印如下内容:
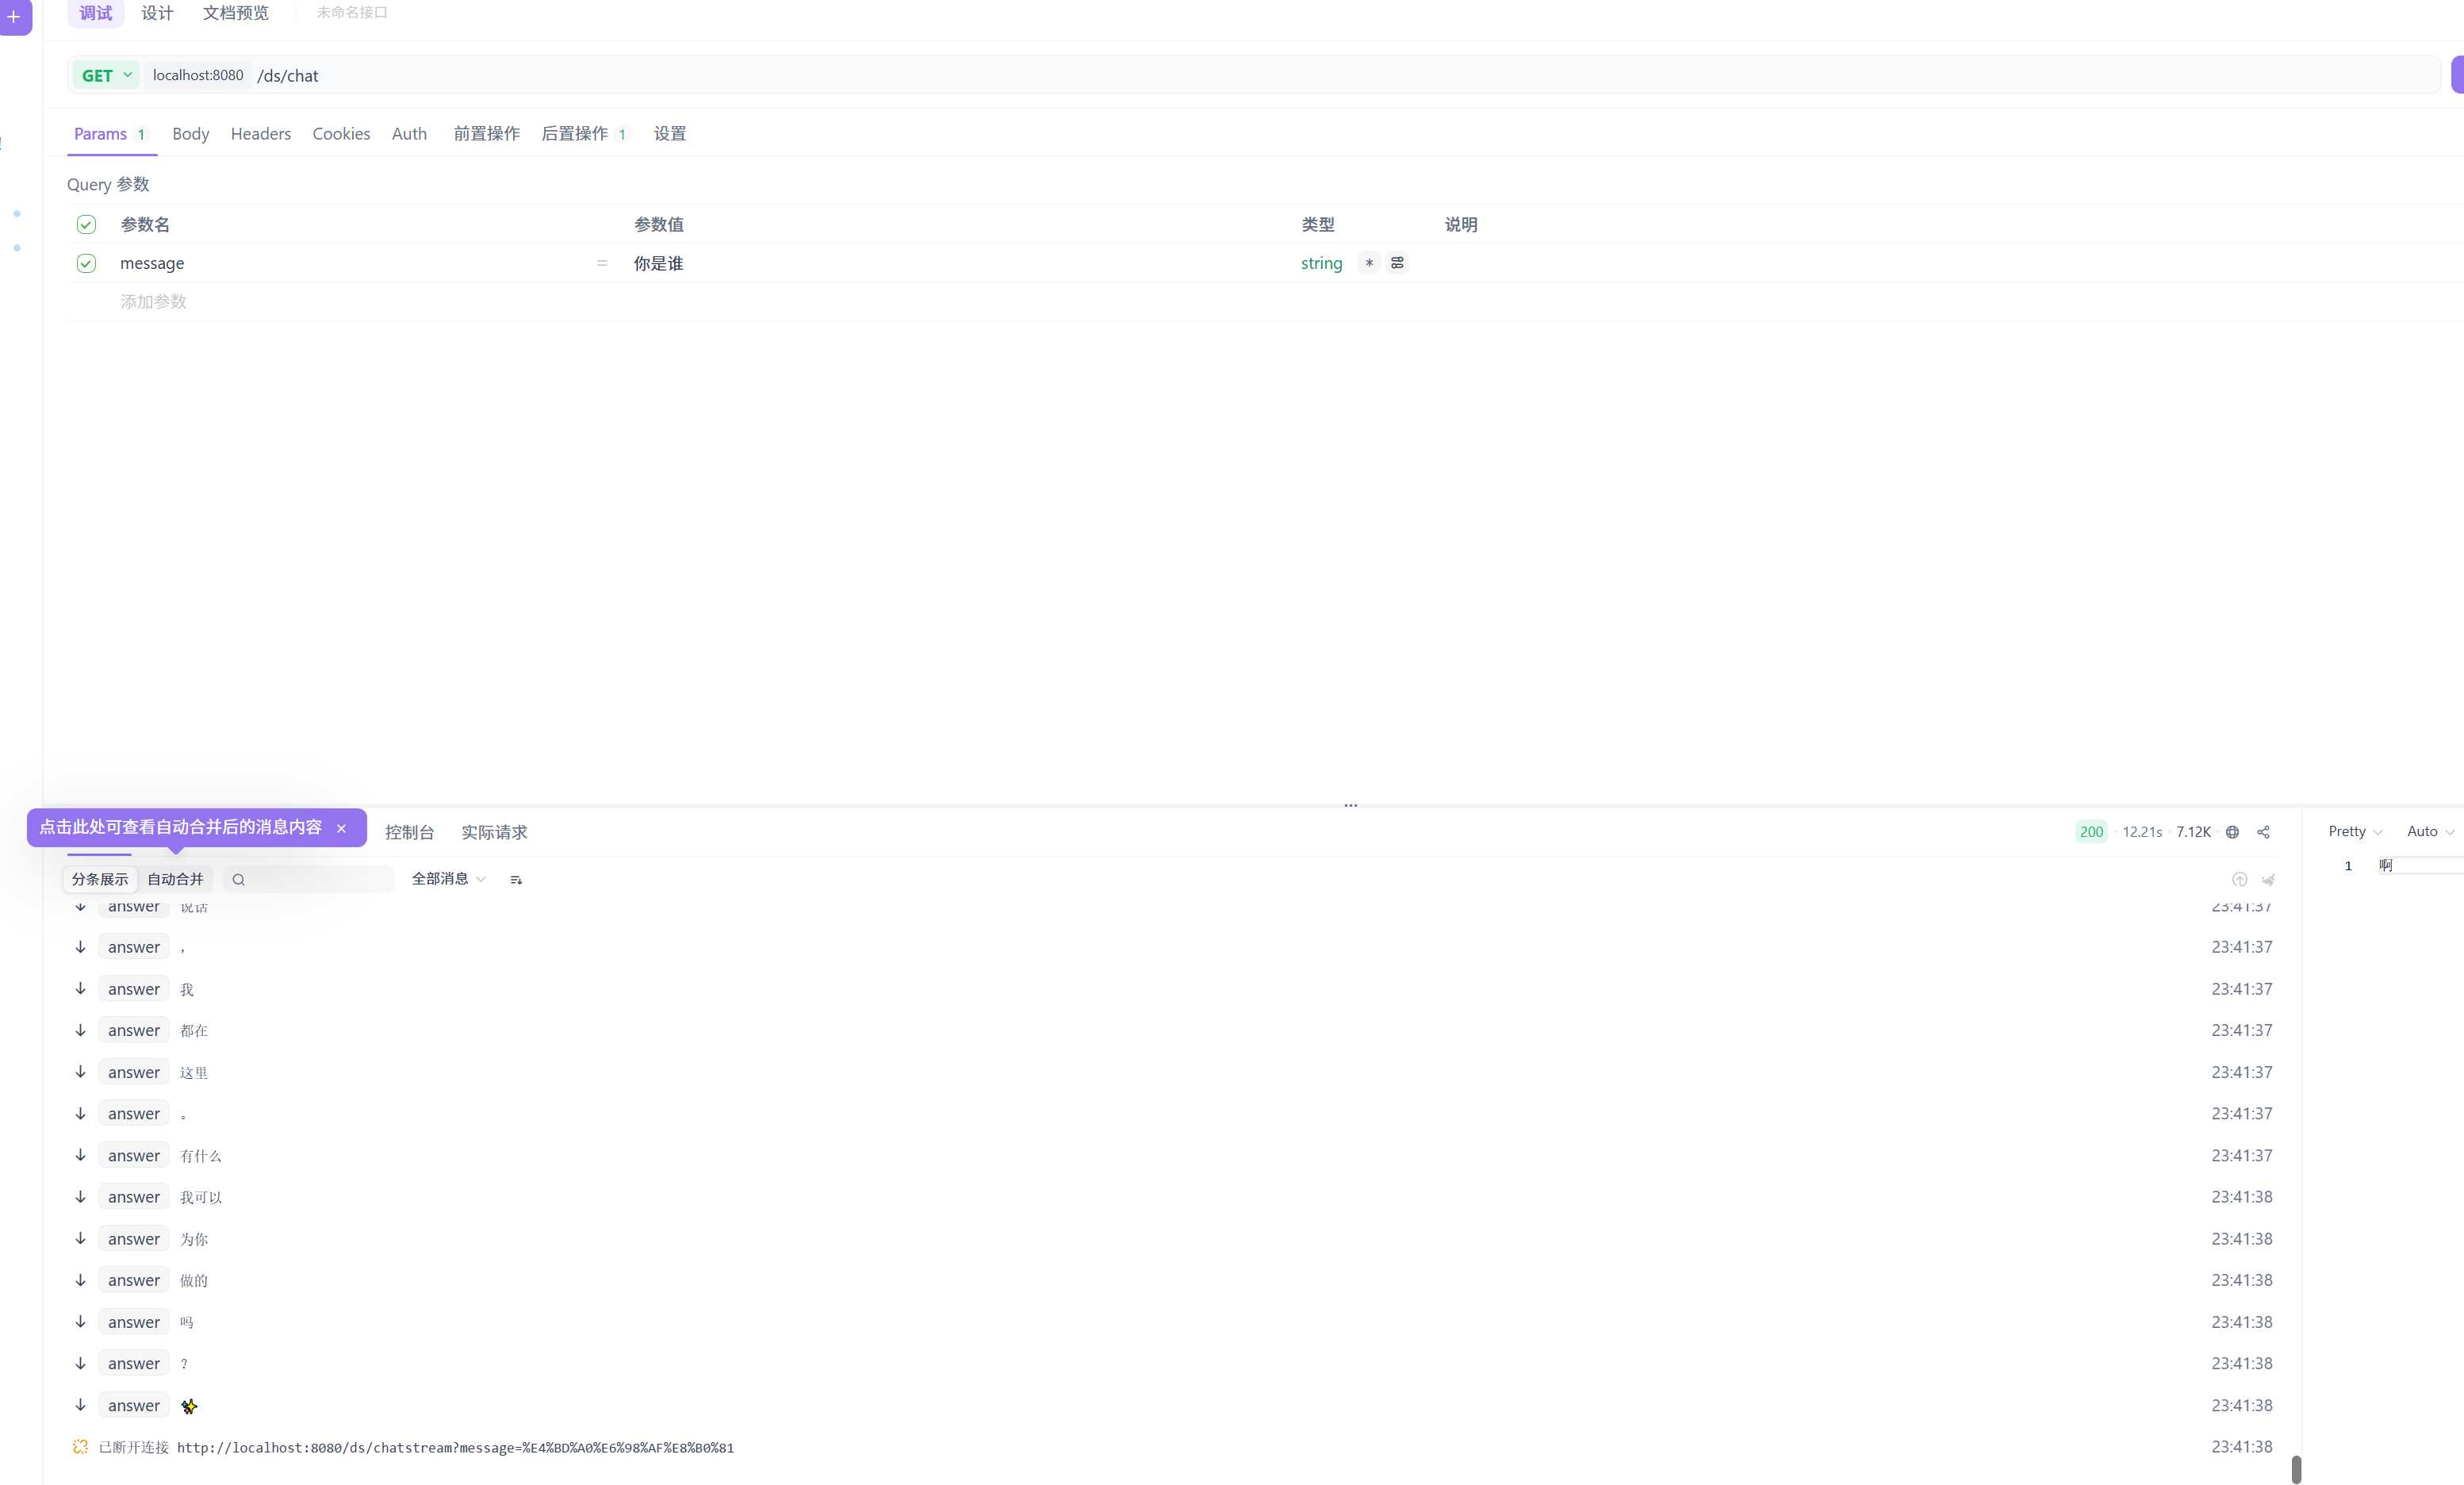
发送请求:http://localhost:8080/ds/chatStream?message=你是谁
postman或者apiFox会显示逐个打印的回复,里面包含了推理部分和最终答案
以上就是Spring AI的初体验,用起来并没有多大难度。但这个例子的AI是没有上下记忆的,后面我们再补充如何让Spring AI在请求大模型是带上我们的上下文。
